
S-14For students
Resources: course documents and your own files and links
Find every document of your courses, upload your own study files and save websites.
How-to video S-14 · 1:04
Read the words of this video
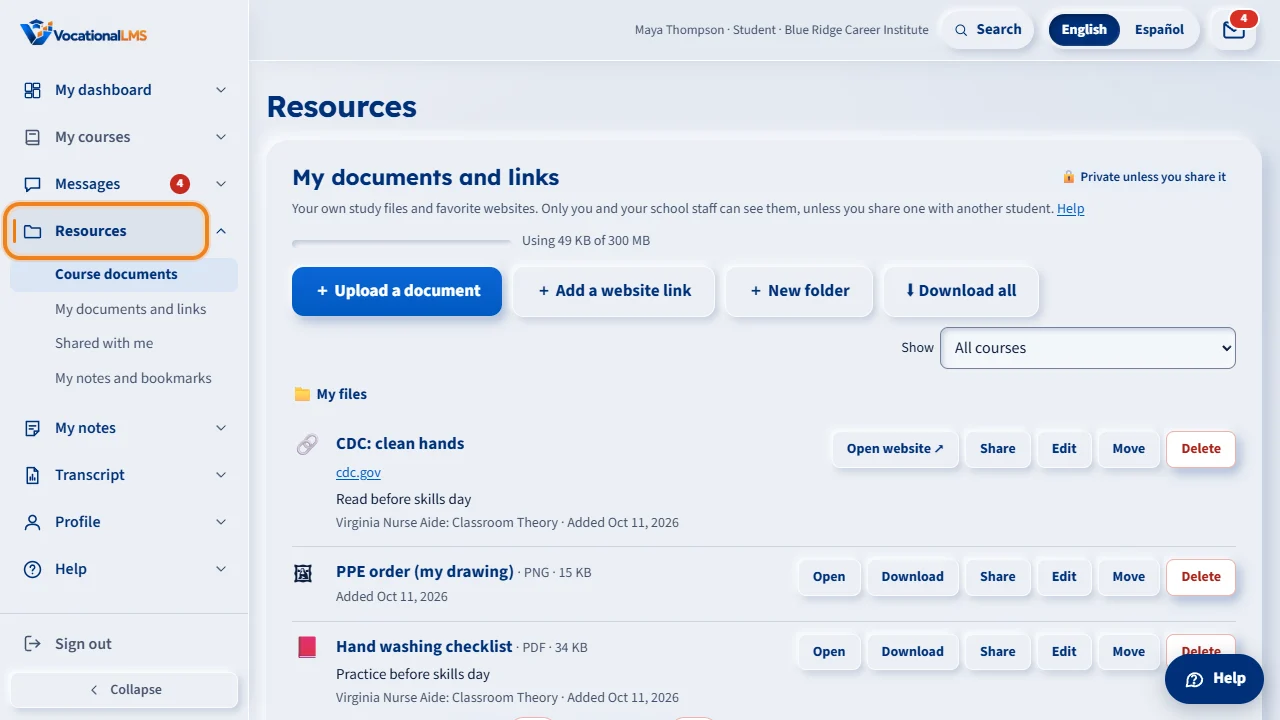
Click Resources in the menu on the left. My documents and links is your own space for study files and useful websites. Only you and the staff of your school can see it. The bar shows how much of your 300 megabytes is used.
Click Upload a document and choose a file up to 25 megabytes: a PDF, Word, PowerPoint, Excel, a picture or a text file. Add a note and the course if you like, then click Upload.
Click Add a website link to save the address of a website you want to come back to.
Each item can be opened, downloaded, edited or deleted. Delete asks you to click twice. Only you and your school's staff can see these.
Course documents lists every document of your courses, chapter by chapter, so you do not have to open each lesson to find a handout. Click a name to open it. Download is there when your school allows it.
Open this in VocationalLMSResources > Course documents
What it is for
Resources keeps everything you read and save in one page, in sections you open and close: Course documents (all the documents of your courses, chapter by chapter), My documents and links (your own space for study files and useful websites), My lesson notes (the notes you typed in your lessons) and Shared with me (what classmates shared with you, when your school allows sharing). Each heading says how many things are inside.
Steps
Open and close the sections
- Click Resources in the menu on the left.
- Click a section's heading to open it; click it again to close it. The first time, Course documents is open and the others are closed.
- Your page remembers which sections you left open, on this computer or phone.
- The small arrow beside Resources in the menu lists the four sections: choosing one opens it for you. If you have more than one course, Course documents has one row per course: click a course to see its documents.
Upload your own document
- Open My documents and links.
- Click + Upload a document and choose a file: PDF, Word, PowerPoint, Excel, a picture or a text file, up to 25 MB.
- Change the title if you like, add a note, pick the course it belongs to, and click Upload.
Save a website
- Click + Add a website link.
- Paste the address (it must start with http or https), add a title, and save.
Use what you saved
- Open shows a PDF or picture on the page. Download saves a copy. Open website opens the site in a new tab.
- Edit changes the title, note or course. Delete asks you to click twice.
- ⬇ Download all gives you one ZIP file with all your documents.
Read your lesson notes
- Open My lesson notes. Each lesson you typed notes for is listed by course, with the time you last saved it.
- Click a lesson's name to read the notes on the My notes page, Open lesson to change them, or Open My notes for all your notes and bookmarks.
What happens next
Only you and the staff of your school can see your own documents and links. Staff can open them but cannot change or delete them. Other students never see them. You have 300 MB of space; the bar shows how much is used.
Common problems
| # | Problem | What to do |
|---|---|---|
| 1 | A section I want is closed. | Click its heading. The page remembers your choice on this device only, so another computer or phone may open it differently. |
| 2 | There is no Shared with me section. | Your school has turned sharing off. |
| 3 | A file is refused. | It is over 25 MB or a kind that is not allowed. Save it as a PDF and try again. |
| 4 | A link is refused. | Only regular web addresses that start with http or https can be saved. |
| 5 | A course document has no Download button. | Your school set it to view only. Open it on the page. |